Developer documentation
Welcome to the developer documentation of the Junqo-platform. This documentation is intended for developers who want to contribute to the project.
If you are a new contributor, you should start by reading the getting started section. If you need some precise information, see the following sections :
Table of contents
Getting started
Before you begin
Before you begin, you should have a basic understanding of the following:
- Take a look at the contributing guidelines to understand how to contribute to the project.
- Take a look at the code of conduct to understand how to behave in the project.
- Take a look at the project structure to understand how the project is organized.
Prerequisites
- Git
- Docker (v20.10.7 or higher)
- Docker Compose (v1.29.2 or higher)
Testing the project
To test the project locally, you can use the development environment provided by Docker Compose. The deployment process is described in the deployment documentation.
Deploying the project
To deploy the project in production, you can use the production environment provided by Docker Compose. The deployment process is described in the deployment documentation.
Learn more
The documentation below provides more in-depth information about the project.
Project structure
The project is structured as follows:
├── /junqo_back
│   ├── dockerfile.prod
│   ├── dockerfile.dev
│   ├── /src
│       ├── main.ts
├── /junqo_front
│   ├── dockerfile.prod
│   ├── dockerfile.dev
│   ├── /lib
│       ├── main.dart
├── /docs
│   ├── developer_documentation/
│   ├── user_documentation/
│   ├── index.md
├── docker-compose.yaml
├── docker-compose.dev.yaml
Project structure diagram
back: Runs the REST API server to communicate with the database.front: Runs the web server / Flutter app seen by the user.docs: Contains the documentation of the project.docker-compose.yaml: The main file to deploy the project in production mode.docker-compose.dev.yaml: The main file to deploy the project in development mode.tools: Contains utility scripts to manage the project.
Interactions
Notice, the following sections are admitting that you are using the default configuration of the project.
The following diagram shows the interactions between the different parts of the project:
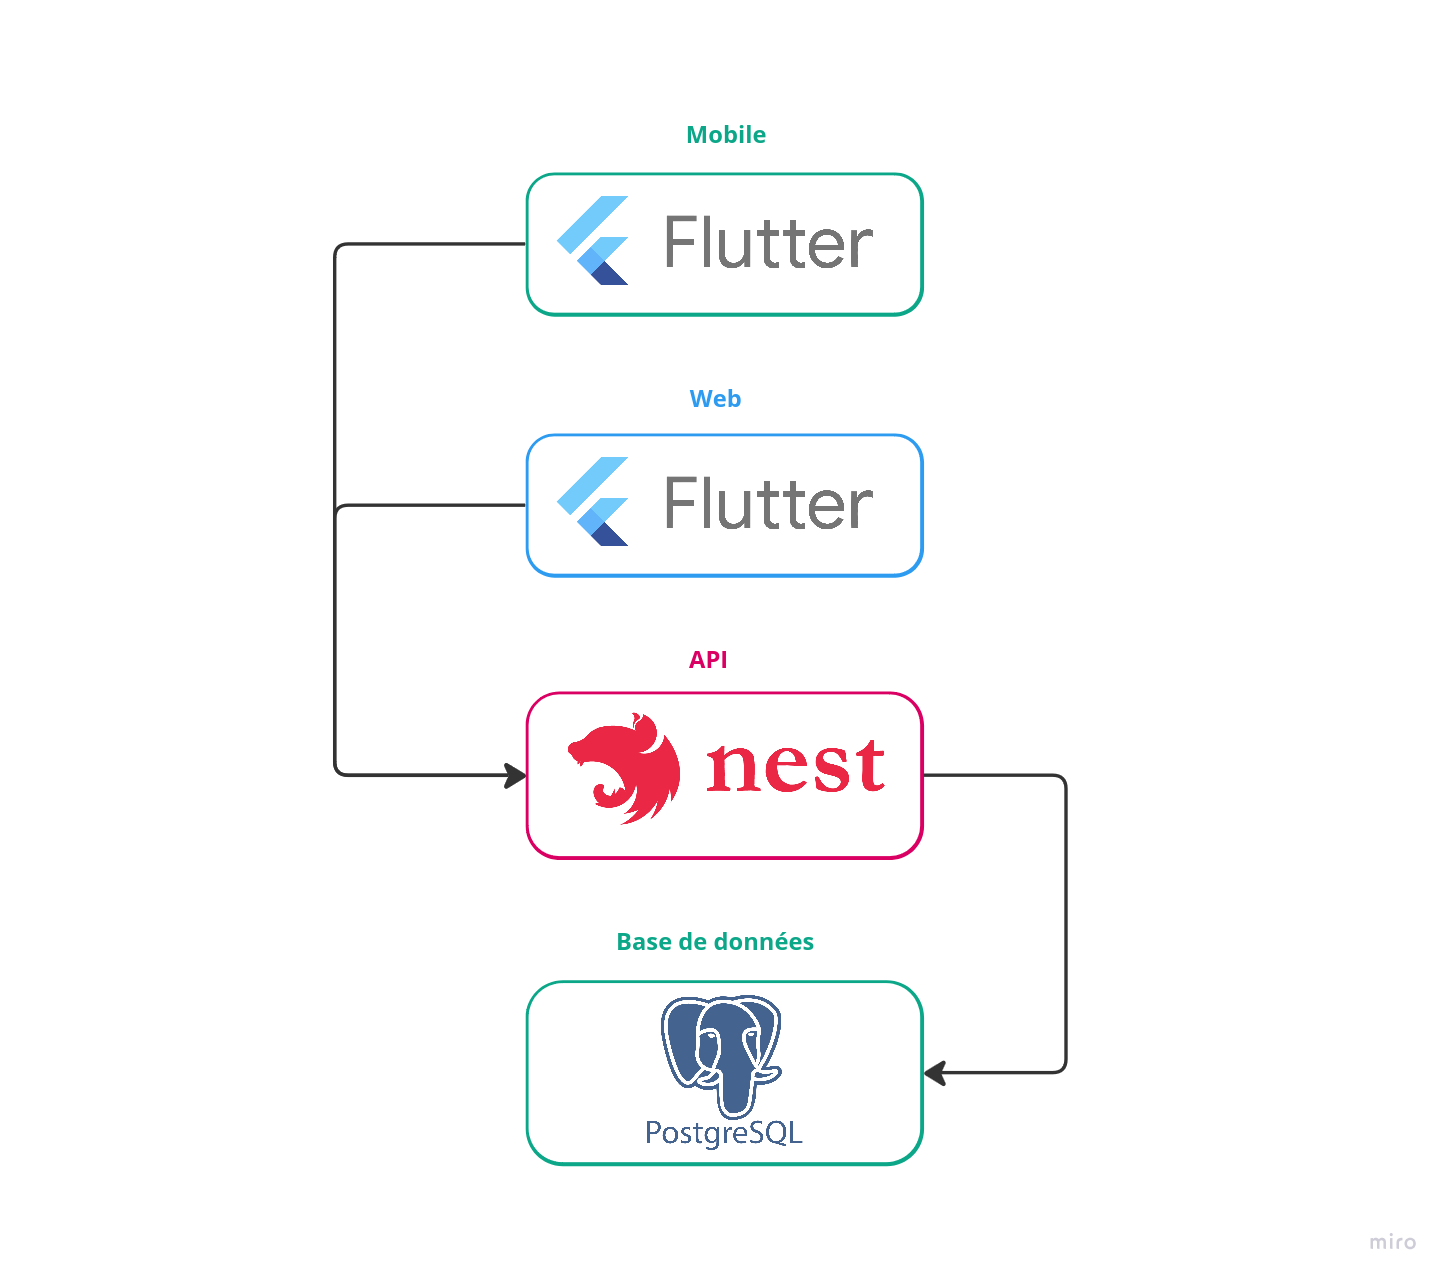
Interactions diagram
The front communicates with the back using the REST API. The back communicates with the database using the database driver. The database stores the data.
Operation
The following diagram shows how the different programs are executed:
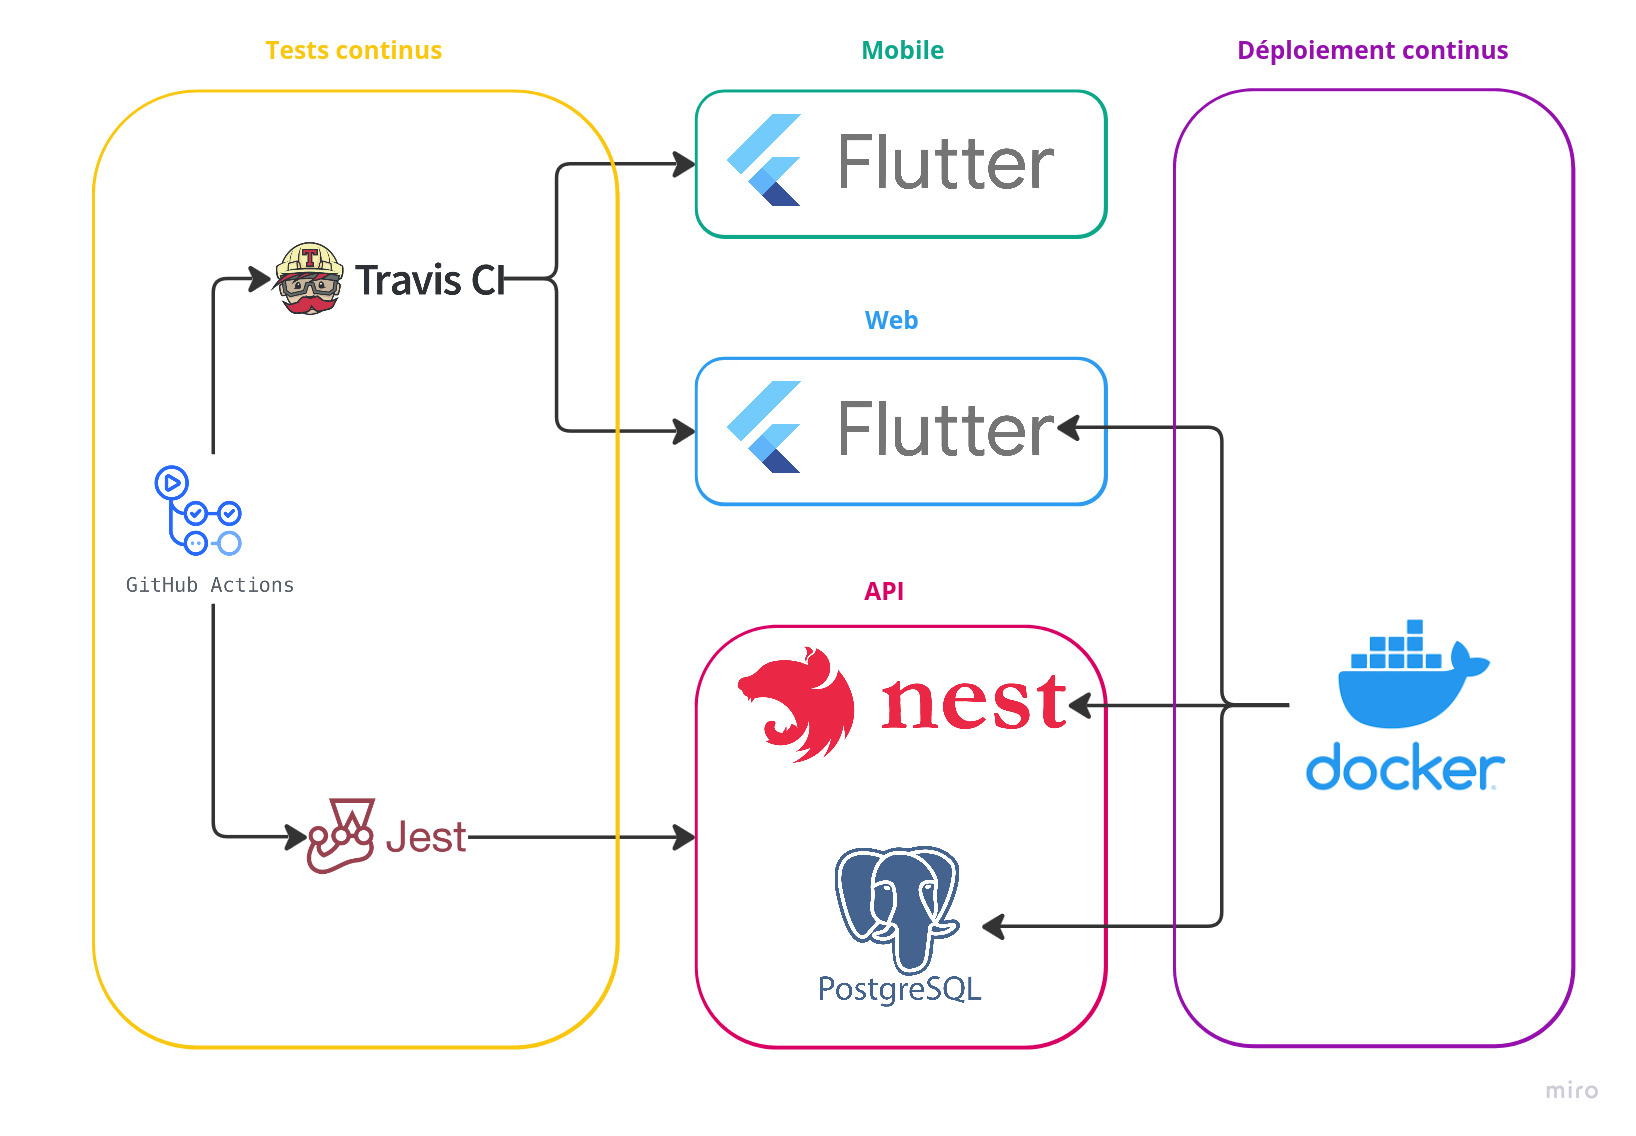
Operational diagram
Networking
Notice, the following sections are admitting that you are using the default configuration of the project.
The following diagram shows the networking of the project:
Development
Development
External ports:   80/443              4200                                         3000
                     |                  |                     db                     |
               +-----------+       +----------+ backnet +------------+ backnet +-----------+
               |   Front   |       |   Back   |---------|  Database  |---------|  Adminer  |
               +-----------+       +----------+         +------------+         +-----------+
---
title: Networking Development
---
flowchart TB
  %% External ports
  subgraph Ports
    direction LR
    P1[[80/443]];
    P2[[4200]];
    P4[[3000]];
  end

  %%Components
  A("**Front**")
  B("**Back**")
  C("**Database**")
  D("**Adminer**")

  %% Connections
  P1 --> A;
  P2 --> B;
  P4 --> D;
  B --"backnet"--> C;
  D --"backnet"--> C;

  %% Styling
  linkStyle 0,1,2,3,4 stroke-dasharray: 4 3
Networking diagram
The front is accessible on the World Wide Web at port 80/443 The back is accessible on the World Wide Web at port 4200 The database is using the backnet network for internal communication and so is not directly accessible from the outside.
The adminer is accessible on the World Wide Web at port 3000 and communicates with the database through the backnet network.
Production
Production
External ports:     80/443                          Localhost:3000
                      |                                   |
               +------------+                             |
               |   RProxy   |                             |
               +------------+                             |
                      |                                   |
                      |-------------------+               |
                      |                   |               |
                +----------+       +------------+         |
                |   Back   |       |    Front   |         |
                +----------+       +------------+         |
                      |                                   |
                      |                                   |
                +------------+                      +------------+
                |  Database  |----------------------|   Adminer  |
                +------------+                      +------------+
---
title: Production Networking
---
flowchart TB
    %% Ports at the top level
    subgraph Ports
        direction LR
        P1[[80/443]]
        P2[[Localhost:3000]]
    end

    %% Components
    RP["**RProxy**"]
    FR["**Front**"]
    BK["**Back**"]
    DB["**Database**"]
    AD["**Adminer**"]

    %% Connections
    P1 --> RP;
    P2 --> AD;
    RP --> BK;
    RP --> FR;
    BK --"backnet"--> DB;
    AD --"backnet"--> DB;

    %% Styling
    linkStyle default stroke-dasharray: 4 3;
Networking diagram
The RProxy (reverse proxy) is accessible on the World Wide Web at port 80/443 and forwards requests to the appropriate frontend or backend service.
The front gets requests from the RProxy, requests to the back pass through RProxy.
The back gets requests from the RProxy and communicates with the database through the backnet network.
The database is using the backnet network for internal communication and so is not directly accessible from the outside.
The adminer is accessible on localhost:3000 and communicates with the database through the backnet network. If on a remote server, you would need to set up an SSH tunnel to access it.
API
The backend API communicate with the frontend. You can find the API documentation at https://junqo.fr/api/v1.
Sequence Diagram
The following diagram shows the sequence of the project:
User SignUp
sequenceDiagram
  participant U as User
  participant LS as Register Screen
  participant FAS as Frontend AuthService
  participant GC as Validation and Transformation
  participant AR as AuthController (Backend)
  participant BAS as Backend AuthService
  participant DB as Database

  U->>LS: Enter credentials
  LS->>FAS: Call signUp(type, name, email, password)
  FAS->>GC: Send signUp request
  GC->>AR: Relay signUp request
  AR->>BAS: Invoke signUp method
  BAS->>DB: Create user record
  DB-->>BAS: Return user data/error
  BAS-->>AR: Return AuthPayload or error
  AR-->>GC: Return response
  GC-->>FAS: Deliver auth result
  FAS-->>LS: Return token and user details
User SignIn
sequenceDiagram
  participant U as User
  participant LS as Login Screen
  participant FAS as Frontend AuthService
  participant GC as Validation and Transformation
  participant AR as AuthController (Backend)
  participant BAS as Backend AuthService
  participant DB as Database

  U->>LS: Enter credentials
  LS->>FAS: Call signIn(email, password)
  FAS->>GC: Send signIn request
  GC->>AR: Relay signIn request
  AR->>BAS: Invoke signIn method
  BAS->>DB: Query user record by email
  DB-->>BAS: Return user data/error
  BAS-->>AR: Return AuthPayload or error
  AR-->>GC: Return response
  GC-->>FAS: Deliver auth result
  FAS-->>LS: Return token and user details
User login status check
sequenceDiagram
  participant U as User
  participant FE as Frontend Component
  participant FAS as Frontend AuthService
  participant GC as Validation and Transformation
  participant AR as AuthResolver (Backend)

  U->>FE: Request login status check
  FE->>FAS: Call isLoggedIn()
  FAS->>GC: Send isLoggedIn request
  GC->>AR: Request login status
  AR-->>GC: Return true
  GC-->>FAS: Deliver status
  FAS-->>FE: Confirm logged in state
CI/CD
For the continuous integration and continuous deployment, the project uses Github Actions and Docker Compose. The CI/CD pipeline is defined in the .github/workflows directory.
You can find the CI/CD documentation here.
Technologies
The project uses the following technologies:
- Overall
- Documentation
- CI/CD
- Frontend
- Backend
- Operations